The SD card and How to add game ROMs to your Pandoras arcade box
There are two ways to install additional 2D and 3D games onto your Pandora's box 3D console.
Both methods take some prep work however the result is well worth it.
The first method has been tested on s812 (18s, Saga, EX2 etc) boards like our King of split retro arcade gaming consoles. This process or variations of will work on other boards depending on many factors. Part of this will be included in the second method which has been tested on additional boards.
Do keep in mind that in the emulation world instant or any success is not guaranteed. The level of success will vary depending on the emulator your gameboard uses, the ROM version and file extension you chose to import. Some consoles be it Mame may have more success than say N64.
As an example Mame being arcade games come in many versions including 0.37b5, 0.78, 0.106, 0.139. So the challenge is finding the ROM version of the game you want that actually works with the emulation version your gameboard has. This is one of the reasons some will work and others will unknowingly fail.
You will also need to make sure the file extension you have is supported - this is shown later on under emulator types and related ROMs.
So while importing games can be done successfully it can also be hit n miss. On a test run of Mame titles we had 2 out 5 imports fail. So with expectations set, before we dive into the first method, make sure you have;
- Desired game ROMs
- Short video preview of each game - if you don't have and a must refer to skraper below
- Big enough USB stick
- Computer to do the grunt work on - we used windows 10
- and MOST IMPORTANTLY backed up your MicroSD card incase something does go wrong.
Backing up your games card
When importing games the Micro SD card is modified. Depending on your console it can be anything from 16GB - 128GB. The EX2 boards come with 8k games 64GB and 10k games on a 128GB Micro SD card.
With anything tech, things can go wrong so its strongly advised that you backup the card. Keep in mind that in most cases your computer wont be able to read the contents and may prompt you to format the card which you must avoid!
In order to backup the card you will need atleast 128GB free space on your computer and preferably a USB 3.0 Micro SD card reader.
This guide should assist in finding and removing the Pandora Box card.
Once removed insert it into the card reader and if prompted to format or anything else click cancel/no.
Depending on your computer you can use programs like
- Win32 Disk Imager
- balenaEtcher
Once you have inserted card into reader and started your desired backup program, you will need to select source being the card and destination being a folder on your computer.
This will create an .IMG file that cant be read. Its sole purpose will be to restore the existing card or a replacement card should you need to revert to the current state at any time. Keeping a backup is highly recomended.
OK, back to it..
Here is the first method, which can be identified by the use of the folder /mcgames
A USB stick, mcgames folder and in that a folder for each game along with a number of files and and game/ROM you want to install is placed into each folder.
So lets get started..
The USB stick "File System" must be formatted to "exFAT". It might be easier to format your USB to ensure this is the case. Of course be sure to backup any data prior.


Once done, lets create that mcgames folder in the root (main area) of USB stick.
In windows 10 or similar right click> New> Folder
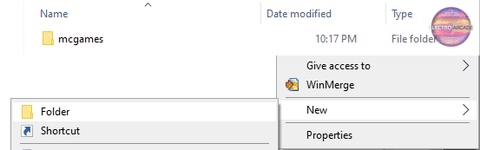
Then in the /mcgames folder lets create "install.txt" right click> New> Text Document

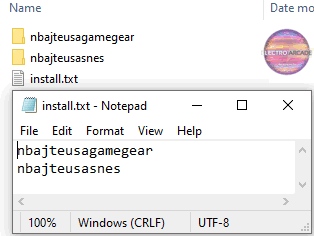
You will now create a new folder under /mcgames for each game you want to add to your Pandora console. Here we have 2 games. So there's 2 folders and the exact name of each folder is also placed on a separate line in the install.txt file.
When naming each folder go out of your way to ensure its unique as this helps avoid a game of that name already existing on your Pandora's box which will mean that game import fails.
Within each game folder you will include;
- The game ROM and extension will depend on console for example .bin .iso .zip
- Video preview of game in .mp4 which shows in main menu - more on this later
- A text file that you will create with the exact same name of the folder we are in - the same name is also used in the install.txt file for this game - see reference and steps below

The above "nbajteusagamegear.xml" file was created in the same fashion by right click> New> Text Document
Once you've finished updating the details in the file you will however need to rename it from a *.txt to *.xml. For example "nbajteusagamegear.txt" to "nbajteusagamegear.xml" by using right click> Rename on the file.
Here is the contents of the above file;
--
<game emulator="15">
<information>
<description>NBA Jam - Tournament Edition GGR</description>
<genre>4</genre>
</information>
<file>
<rom name="nbajteusagamegear.bin"/>
</file>
<translation>
<string language="en">
<name>NBA Jam - Tournament Edition GGR</name>
</string>
</translation>
<config>
<load_time>0</load_time>
<free_play>1</free_play>
<save_state>1</save_state>
<start_directly>1</start_directly>
</config>
</game>
--
Once you have created this file you can simply right click> Copy & right click> Paste to duplicate the file and re-use it by adjusting only whats needed each time.
In this case "game emulator 15" is Gamegear and in the Pandora menu will show the relevant icon, so if you get this wrong for any reason simply delete that game, tweak the .xml file and re-import that game/folder only.
Genre is the game category used for filtering as below;
- 0 – Other
- 1 – Fighting
- 2 – Action
- 3 – Shooting
- 4 – Sport
- 5 – Puzzle
- 6 – Racing
"rom name" must be the exact file name of the game, in this case being nbajteusagamegear.bin
..and lastly "name" & "description" are the same and whats shown in the Pandora games list menu.
The rest can be tweaked if you want to explore more, but otherwise left as is.
Save_state shows when you pause a game giving you the option to save/load game progress.
By default the new games will be shown last being at the end of the games menu list. Keep in mind not all games will work well, so if some don't go as planned you can delete it be pressing the config button at the back of your Pandora unit.
Here are the emulator types and related ROMs supported.
| Emulator | Game emulator | File type |
| fba42 | 0 / 1 | .zip |
| mame37 | 2 | .zip |
| mame139 | 3 | .zip |
| mame78 | 4 | .zip |
| fba42 | 5 | .zip |
| Playstation Portable PSP | 6 | .iso .psp |
| Playstation PSX | 7 | .bin / .img / .pbp (.chd will not work) |
| N64 | 8 | .n64 / .z64 |
| Famicom NES | 11 | .fds / .nes / .unf / .inf |
| Super famicom SNES | 12 | .smc / .sfc / .swc / .fig / .bs |
| Gameboy Advance | 13 | .gba / .bin / .agb / .gbz |
| Gameboy Color | 14 | .gb / .gbc / .sgb |
| Sega Megadrive (Genesis), Game gear | 15 | .mdx / .md / .smd / .gen / .bin / .cue / .iso / .chd / .sms / .gg / .sg |
| Wonderswan | 16 | .ws / .wsc / .pc2 |
| PC Engine | 17 | .pce / .cue / .ccd / .chd |
| Sega Dreamcast | 18 | .chd / .cdi / .iso / .cue / .gdi / .lst / .bin / .dat / .zip / .7z |
| mame19 | 19 | .zip |
Supported Mame versions
Mame 0.37b5, 0.78, 0.106, 0.139
Skraper and video previews
If you don't have the short video preview for the game/s you're adding, and want to add it you can use a beta program called Skraper. This checks your chosen folders and crawls the web to match/find the games artwork/video.
It is recommended you use skraper before renaming your game ROM files.
Here's a quick rundown.
You'll need to visit https://www.skraper.net/ and download/install it for Windows, Mac or Linux.
Once installed and running it will load up its resources - how long this takes depends on the sites load. given its a free system time can vary dramatically. Signing up for a free account will give you priority over unregistered users. If you like the service please donate.
After each page and selection click next :-). Your first selection is "recalbox", then let it know the main folder your game ROMs are located in. it will then check your folder and identify consoles the found ROMs belong to. Ok once you reach the last page go take a break as it retrieves the assets for your ROMs.


Now as we don't need any image media, we click the side arrows and select "VIDEO".

Click the play button and take a break...

Once its completed, you'll need to copy each video to the right game folder and ensure its the right file name.
Once done right click on USB drive and select eject.
Now for the fun part, plug the USB stick into the bottom rear port on your Pandora's box. It should pick it up and prompt you for a YES (Button A) or NO (Button B).
Click button A and let it start importing. Once done, turn your Pandora's box off, remove the USB stick and reboot.
you can then scroll to the last page of your games list where you should see the newly imported games.
If any are not there you will need to check file name and compatibility of that ROM and try that/those on an individual basis.
Happy gaming...